JAVA development tools install
The JAVA
Language is characterized by the JAVA Virtual Machine (JVM) known also in the
JAVA world as JAVA Runtime Environment (JRE).
This piece
of software gives JAVA its key characteristic which is the portability.
This means
that the JVM allows a program written in the JAVA language to be run in the
platforms that have the JVM installed.
This is a
big advantage of JAVA when we compare it with other programming languages like
the C or C++ languages which are not portables.
In fact,
any JAVA program gets compiled to get a binary code called Byte code and then
the JVM reads these binary instructions and executes them.
This makes
JAVA as a compiled and interpreted language because the program goes through
the compilation step to become a byte code and then it gets interpreted by the
JVM in order to make it run on our computers.
We will
deal in depth with the compilation, interpretation and their steps in this dedicated
tutorial, but now we will focus only on installing the JAVA tools
and JAVA IDEs in order to get started with JAVA.
In order to
start to program in JAVA, we need also an Integrated Development Environment
(IDE) which is a piece of software which facilitates the development task by
giving us a set of tools and menus which make programming easier:
·
Text
Editor
·
Easy
compilation and execution of JAVA programs
·
Debugging:
helps us to find programming errors in a JAVA program
·
Many
other tools which help us in project management and other stuff
Surely, you
can program in JAVA without using an IDE but this will not be practical.
In this
case, you need a text editor I addition to the JDK and you need to run your
programs in the command line.
If you want to learn to program in JAVA in the command line, please check this tutorial to get an idea about how this can be done.
Install the necessary JAVA development tools
Choose between JRE or JDK as a JAVA development tool
Now, we
know what the JRE is because we explained it in the introduction of this
tutorial but I will recall this concept.
So, the JRE
is necessary to run a program written in JAVA but if you want to write your own
programs and run them on any machine, you need the JDK.
The JDK
(JAVA Development Kit) contains the JRE, a set of a precompiled and ready to
use classes which implement the features of the JAVA language, the compiler and
the necessary JAVA development tools.
I advise
you to download the latest stable JDK through this link.
Once you
click on download JDK you will get into this page.
Check the
radio button: Accept licence Agreement. Then click on the download link which
corresponds to your platform (x86 for 32 bits Operating Systems and x64 for 64
bits Operating Systems).
For windows
platform, the download links are highlighted.
The JAVA
language allows developing applications for different platforms:
·
JAVA
SE (JAVA Standard Edition): used to develop desktop applications manned to be
run on computers (the subject of this tutorial about JAVA Fundamentals)
·
JAVA
EE (JAVA Entreprise Edition): used to develop web applications in JAVA
·
JME
(JAVA Micro Edition): used to develop applications for mobile devices, PDA,…
·
Android:
used to develop applications for all the devices that have Android as its
Operating System (mobile phones, tablets, TV, washing machine, …)
The Eclipse IDE (The well known JAVA development tool)
Eclipse IDE
is a JAVA development tool developed in its own in JAVA. It is an Integrated
Development Environment which allows to program in many other programming
languages like PHP, C, C++, TCL, Javascript…
The eclipse
IDE is developed based on the plugin concept. So in order to add a new
functionality the the IDE, you need to install the plugin that ensures this
functionality.
In order to
know how to install a plugin in eclipse, please check this tutorial.
The Eclipse
IDE will help us in compiling and running our programs.
To get the
eclipse JAVA development tool, we need to download the latest stable version
from the eclipse IDE website.
We need to choose
Eclipse IDE for Java Developers
option which is compatible with our operating system.
You need to
select your target platform as it s shown in the image below in order to get
the right download for your platform.
You find
many versions of the Eclipse IDE in the official website but there are no big
differences between these versions other than additional plugins preinstalled
for each version.
Then,
select a mirror for your download (The nearest mirror to your location is the
best option) and wait for the download to finish.
You can
choose the default mirror for your download by clicking the download button:
Or you can
choose another mirror (highlighted in yellow) from the mirrors that you will
find at the bottom of the page.
When the
download finishes, you will get an archive file which contains the Eclipse IDE
files and folders.
If you
think that the Eclipse IDE should be installed on your computer before you
launch it, you are wrong because this software needs only to get unzipped and
then you can launch it by clicking on the eclipse.exe file that you find in the
unzipped folder.
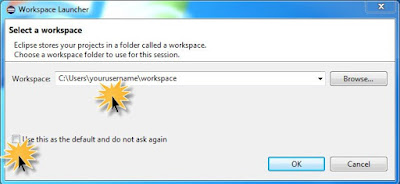
Once you
click on the eclipse.exe file, the following dialog appears to ask you about
the location of the JAVA workspace.
The
workspace is the folder which will contain all your projects (the default
workspace path is C:\users\yourusername\workspace).
So, keep
the default path and click on OK. If you want that this dialog will not appear
again when you launch the Eclipse IDE, you need to check the “Use this as
default and do not ask again” option.
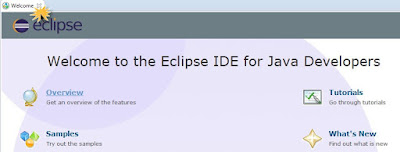
Finally,
close the welcome screen by clicking the x sign to get an overview of your
recently downloaded JAVA development tool.
Introduction to the Eclipse IDE interface
The use of
each of the buttons of the Eclipse IDE toolbar is explained below:
1) Replaces File -> New
2) Create new visual class (for
creating GUI classes)
3) Save: saves the current file. The
same thing can be done with the shortcut (CTRL + S)
4) Save all: saves all the modified
files in the project
5) Debug: helps you to find programming
errors in your project
6) Execute the current Class or the
current project
7) Runs the last used JAVA development tool
8) Create a new package: replaces File > New > package
9) Create a new class: replaces File
> New > Class
Please,
don’t be afraid if you encounter a new term, because we will explain it later
in the course when we need it.
Create the First JAVA project using the eclipse JAVA development tool
Now, we
will create a new JAVA project to make sure that our JAVA installation works
fine.
So you
should follow these steps:
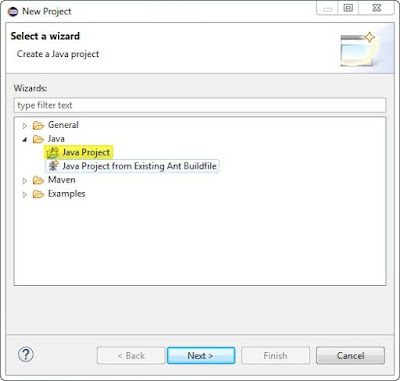
Step 1: Click
on File > New > Project then choose JAVA project and click next
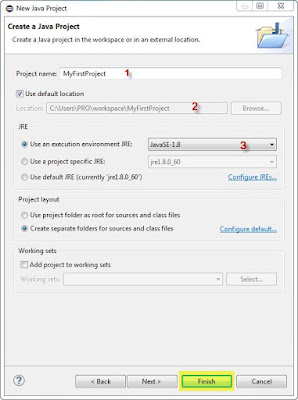
Step 2: Fill
the project name field with a string (For example MyFirstProject), choose your
JAVA SE version that you will use with the current project (Keep the default
and you are done) and click on finish.
The
principal fields in the screen below are:
1) the project name
2) the location of the project in the
hard disk (“C:\users\yourusername (PRO in our case)\workspace\MyFirstProject”)
3) The JAVA SE version used in this
project (in our case, it is JAVA SE 1.8)
Now, you
should see your recently created project in the left hand window.
The next
step is to create the main class and to put some code to test our JAVA tools.
Create the first JAVA Class using the eclipse development tool
Don’t be
afraid of the new concept of class, because we will explain it later in the course.
In order to
create our First JAVA class we should follow these steps:
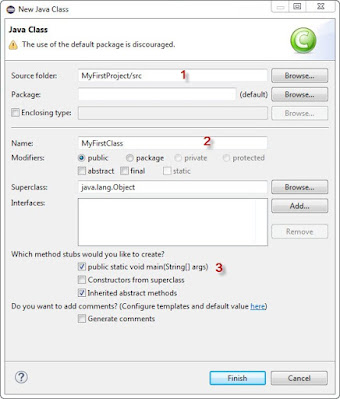
Step 1:
Choose File > New > Class
The field
number 1 which is the project source shows where the class is stored in the
project (My Project /src is the folder where the class file is saved)
The field
number 2 contains the class name (choose the name MyFirstClass for example).The
name of a class should begin by a capital letter and each word in the name
should begin by a capital letter also: this is called the Camel Case rule.
The selected
public static void main(String[] args)
option informs eclipse to generate this method automatically in the
created class.
After
clicking the finish button, your project will be like this:
The package
explorer in the left hand side in yellow shows the project files.
The pink
area shows the content of any file when you double click it.
The orange
area (the outline window) shows the methods and attributes contained in a class.
The purple
area shows the output of the execution of a JAVA program.
Please, bare
in mind that any JAVA program should have at least one class and only one main
class.
The main
class contains the main method (public static void main(String[] args) ) and this class is the entry point of a JAVA
program.
This means
that when we run a JAVA program, we run the main method of its main class.
Create the first JAVA Program using the eclipse development tool
We will add
a code to the main method of our main class that we named MyFirstClass in order
to say hello to the world.
The code to
add to the main class is the following:
We should
add this line inside the main method: System.out.print("Hello
World !");
So, the
main method becomes like this:
public static void main(String[] args){
System.out.print("Hello World !");
}
Now, we
should run our program by clicking the highlighted button shown below.
Once the
program is run, you should see the “Hello World !!” message in the console
window.
This method
executes the method print() of the object out of the class System.
This method
will display the hello world message in the console window.
The printed
message is highlighted in yellow in the screen above.
This
tutorial arrived at its end. So, if you have any questions or remarks about any
JAVA development tool or subject, please don’t hesitate to give us your
feedbacks by adding comments and suggestions.
Also, if
you want to get the latest JAVA tutorials, please consider following us on the how to program Facebook
page .
You can
also check our core java tutorial to get our latest java tutorials for free.
This tutorial is one of many tutorials proposed by our website.





Post a Comment